Heart Click
This is going to be our first “Arcade” game, one with images and a fast-paced mouse-based interaction:
We are going to show an image (a heart)
We are going to move that image around the screen
The user needs to click on the heart with the mouse to win
(Let’s see what the finished game will look like)…
Note
This is going to take a few weeks, likely. Don’t expect to finish the whole game today. If you are feeling lost, feel free to work with a friend.
First, A Pink Screen
You can download this file . To do that, use the right-hand mouse-button to click on the link. Choose “Save Link As” and save the file to your H:drive. We are going to walk through what’s going on in the file so you understand how an “event loop” works.
# Multimedia library, display/screen control, timing control
import pygame
import pygame.display
import pygame.time
# What does our time-keeping for us... a clock
clock = pygame.time.Clock()
# Window 300x300 pixels, then make it visible
screen = pygame.display.set_mode((300, 300))
pygame.display.init()

# Here is where we will set up the game's images,
# sounds, and anything else we need to run...

while True:
    # Get the first waiting event from the user...
    event = pygame.event.poll()
    # NOEVENT means "no more events"
    while not (event.type == pygame.NOEVENT):
        if ( # was the user asking to exit?
            event.type == pygame.QUIT or
            (event.type == pygame.KEYUP and event.key == pygame.K_ESCAPE)
        ):
            raise SystemExit(0)

        # here is where we will process the user's mouse-clicks, keyboard
        # presses, etceteras

        # get the next event to process
        event = pygame.event.poll()

    # Display our frame, the colour is a very light pink...
    # (RED,GREEN,BLUE) with each value from 0 to 255
    screen.fill((255,230,230))

    # here is where we will draw the game...

    # Until now we've been drawing off-screen, now we'll "flip"
    # the drawn surface onto the screen
    pygame.display.flip()
    # wait the rest of the 1/60th of a second
    clock.tick(60)
If we save and run this file, we’ll see an empty pink window.
Our game works like this:
we loop forever and for every trip round the loop
we check to see if the user has done anything and update our “model” of the game
currently we just check to see if they asked us to exit
we “render” the game into memory
we “flip” the rendered game board onto the screen (make it visible)
Adding a Heart
We need to draw a heart, so we need to get an image of a heart to draw. We are going to save two images in the same directory as our game.py script:
To do so, use the right-hand mouse-button to click on the links above. Choose “Save Link As” and save the files to the directory where you are writing your game (on your H:drive).
But how do we find out where those files are for our game? When we run a script we get a __file__ variable defined which points to the module which is being run (in our case, this is the script game.py).
This script just prints out the directory where the Python file is saved:
import os
print(__file__)
HERE = os.path.dirname(__file__)
print(HERE)
So how do we go from “the name of the python game file” to “the name of an image sitting next to the python game file”?
>>> import os
>>> filename = '/path/to/filename.py'
>>> os.path.dirname(filename)
'/path/to'
>>> HERE = os.path.dirname(filename)
>>> os.path.join( HERE, 'heart.png' )
'/path/to/heart.png'
So in our game, we want to modify the game-setup code to find the heart.png file:
# We want to find our image file, called `heart.png`, to do that,
# we need to figure out where our game.py file is...
import os
# __file__ is the filename of *this* python file
# os.path.dirname(filename) finds the directory that holds the filename
HERE = os.path.dirname(__file__)
# os.path.join( HERE, 'name.png' ) gives us the file "next to" our
# python file called "heart.png"
heart_filename = os.path.join(HERE,'heart.png')
Great, but now how do we actually use the image file in our game? We are going to use the pygame.image library’s load function to open the image filename and give us an image “object” that we can use to draw the image onto the screen.
>>> import pygame.image
>>> image = pygame.image.load('heartclick/heart.png' )
>>> image
<Surface(32x32x32 SW)>
So what we got out of that pygame.image.load call is a Surface that we can copy onto the screen (also a Surface). Let’s see what we can do with our Surface:
>>> dir(image)
[...'blit', 'blits', 'convert', 'convert_alpha', 'copy', 'fill', 'get_abs_offset', 'get_abs_parent', 'get_alpha', 'get_at', 'get_at_mapped', 'get_bitsize', 'get_bounding_rect', 'get_buffer', 'get_bytesize', 'get_clip', 'get_colorkey', 'get_flags', 'get_height', 'get_locked', 'get_locks', 'get_losses', 'get_masks', 'get_offset', 'get_palette', 'get_palette_at', 'get_parent', 'get_pitch', 'get_rect', 'get_shifts', 'get_size', 'get_view', 'get_width', 'lock', 'map_rgb', 'mustlock', 'scroll', 'set_alpha', 'set_at', 'set_clip', 'set_colorkey', 'set_masks', 'set_palette', 'set_palette_at', 'set_shifts', 'subsurface', 'unlock', 'unmap_rgb']
>>> image.copy()
<Surface(32x32x32 SW)>
>>> image.get_size()
(32, 32)
>>> image.get_at((0,0))
(0, 0, 0, 0)
We’ll add this to the game setup area of our game:
import pygame.image
# Open this filename and interpret the contents as an image file
heart = pygame.image.load(heart_filename)
# Convert the image into a format that is appropriate for our screen
heart = heart.convert_alpha(screen)
Note
Why .convert_alpha(screen)?
You will note that we called convert_alpha on the thing we loaded from the file. We did that in order to make the image compatible with the screen onto which we will be drawing.
Where To Draw
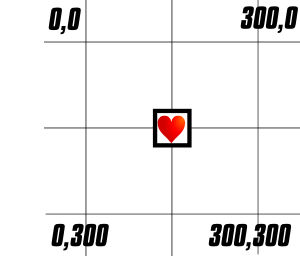
When we ask the computer to put the image of the heart onto the screen, we need to tell it where to copy the image. With Pygame we do that by getting a rectangle into which we will copy the image. We can move the rectangle around to move where we will copy the image.
Let’s play with a rectangle a bit to see what they can do:
>>> rectangle = image.get_rect()
>>> rectangle
<rect(0, 0, 32, 32)>
>>> dir(rectangle)
[...'bottom', 'bottomleft', 'bottomright', 'center', 'centerx', 'centery', 'clamp', 'clamp_ip', 'clip', 'collidedict', 'collidedictall', 'collidelist', 'collidelistall', 'collidepoint', 'colliderect', 'contains', 'copy', 'fit', 'h', 'height', 'inflate', 'inflate_ip', 'left', 'midbottom', 'midleft', 'midright', 'midtop', 'move', 'move_ip', 'normalize', 'right', 'size', 'top', 'topleft', 'topright', 'union', 'union_ip', 'unionall', 'unionall_ip', 'w', 'width', 'x', 'y']
>>> rectangle.center = (150,150)
>>> rectangle
<rect(134, 134, 32, 32)>
>>> rectangle.left = 0
>>> rectangle
<rect(0, 134, 32, 32)>
>>> rectangle.bottom = 300
>>> rectangle
<rect(0, 268, 32, 32)>
>>> rectangle.collidepoint( (1,268))
1
That last call to collidepoint is asking the rectangle “is this point inside you?” and it returns 1, a True value.
>>> rectangle.move( (10,10) )
<rect(10, 278, 32, 32)>
>>> rectangle
<rect(0, 268, 32, 32)>
That last one creates a new rectangle, it doesn’t change the rectangle itself. We could have used move_ip if we wanted to change the original rectangle.
We’ll put this into the game-setup area of the game to calculate the initial rectangle for the heart.
# Where to display this image?
# we want to start the heart in the centre of the screen
# note the *American* spelling of "center", not Canadian/British spelling!
heart_rectangle = heart.get_rect(center=(150, 150))
Drawing (Blitting) the Image
To draw an image (Surface) on another Surface (such as the screen) we ask the thing we want to draw onto to blit (copy) the image onto itself:
screen.blit( image, area=rectangle )
This has screen copy the pixels from image into the coordinates represented by rectangle. Because we are using an image with transparency, the pixels in image are blended into the pixels currently on the screen, rather than overwriting them completely.
This is going to go into the game just after we fill the screen (the call to screen.fill):
    # this is where we draw our scene
    # "screen, please copy this image into this rectangle"
    screen.blit( heart, heart_rectangle)
Checking for a Heart-Hit
Before we start moving the heart around, let’s make it possible to win the game. We want to see if the user has clicked the mouse inside the rectangle where we are currently drawing the heart (heart_rectangle).
We will put this just after we check to see if the user has asked us to exit/quit:
        if event.type == pygame.MOUSEBUTTONDOWN:
            if heart_rectangle.collidepoint(event.pos):
                # The user has won, we should let them know...
So now we know that the user has successfully hit the heart, but how do we tell the user that they’ve won?
Rewarding the User
We need some way to tell the user that they’ve won, for now we’ll just change the “heart” into an “award” and display that. If you didn’t download it yet, do so now:
We’ll modify the game-setup code to load the award.png file in exactly the same way as we loaded heart.png, from a file sitting next to our game.
# Find, load and convert the user's award image...
award_filename = os.path.join(HERE,'award.png')
award = pygame.image.load(award_filename)
award = award.convert_alpha(screen)
To draw the award, we just make the name “heart” point at the image we loaded into the name “award”:
                # The user has won, display their reward from now on!
                heart = award
Now every time we go to render “heart” we will actually be rendering “award”. Because the images are the same size, we can use the “heart_rectangle” to blit the award without changing any other code.
Moving the Heart
So to move the heart, we need to change its x and y coordinate, with the size of the x and y change being its “vector” of motion.
If the numbers are negative, the heart will move up/left, if they are positive, it will move down/right. The larger they are, the faster the heart will move.
import random
direction = (random.randint(-5,5),random.randint(-5,5))
Okay, so how do we actually get the rectangle to move? We ask the rectangle to “move” itself with its move method.
heart_rectangle = heart_rectangle.move(direction)
Bouncing Heart
It’s not a very fun game if the heart goes off-screen in a second. We need to make the heart bounce when it hits the edge of the screen.
    if heart_rectangle.top < 0 or heart_rectangle.bottom > 300:
        direction = direction[0], -direction[1]
    if heart_rectangle.left < 0 or heart_rectangle.right > 300:
        direction = -direction[0], direction[1]
    # Keep the heart on-screen no matter what!
    heart_rectangle = heart_rectangle.clamp( screen.get_rect())
The call to heart_rectangle.clamp tells the rectangle to create a new rectangle that is entirely inside the screen’s rectangle (so that the heart cannot go off-screen).
Randomizing Motion
Now the game is a bit too easy, so let’s add a bit of randomness to the heart’s motion:
    # now a bit of randomness...
    if random.random() > .98:
        direction = direction[1],direction[0]
Exiting on Winning
As well as changing the heart to an award, we could exit the game when the user wins. Pygame’s time module has set_timer that lets us schedule an event to be sent after a given number of milliseconds (one-one-thousandth of a second).
We want to send the pygame.QUIT event after 1.5 seconds, which is 1500 milliseconds.
                # Quit 1.5s after they win
                pygame.time.set_timer(pygame.QUIT, 1500)
Audio Prompts
Instead of just exiting silently, we could play a congratulations and exit when that finishes. Here are some audio-prompts you can use to start:
Let’s look at the process for loading an audio file:
>>> import pygame.mixer
>>> pygame.mixer.init()
>>> instructions = pygame.mixer.Sound('heartclick/clicktowin.ogg')
>>> dir(instructions)
[...'fadeout', 'get_length', 'get_num_channels', 'get_raw', 'get_volume', 'play', 'set_volume', 'stop']
>>> instructions.get_length()
1.51...
You can record your own prompts with Audacity (or any other program that can save .wav or .ogg files).
import pygame.mixer
pygame.mixer.init()
instructions = pygame.mixer.Sound(os.path.join(HERE,'clicktowin.ogg'))
# start the instructions playing as soon as the game loads
instructions.play()
congratulations = pygame.mixer.Sound(os.path.join(HERE,'youwin.ogg'))
Modify the “when the user wins” section to play the youwin.ogg file and exit when it finishes playing.
>>> help(instructions.play)
...Sound.play(loops=0, maxtime=0, fade_ms=0): return Channel...
So playing the sound returns a Channel which has a method called set_endevent that will make the channel send an event when we have finished playing the sound. We’ll use it to send the pygame.QUIT event so that the game will exit as though the user had hit the close button on the window.
                # the user won, yay!
                channel = congratulations.play()
                channel.set_endevent( pygame.QUIT )
Final Sample Code
You can download the full source code for the game, including audio prompts:
# Game Setup
import pygame
import pygame.display
import pygame.time
import os
import pygame.image
import random
import pygame.mixer

clock = pygame.time.Clock()
screen = pygame.display.set_mode((300, 300))
pygame.display.init()
pygame.mixer.init()

#setup_state_start
HERE = os.path.dirname(__file__)
heart_filename = os.path.join(HERE,'heart.png')
heart = pygame.image.load(heart_filename)
heart = heart.convert_alpha(screen)
heart_rectangle = heart.get_rect(center=(150, 150))
award_filename = os.path.join(HERE,'award.png')
award = pygame.image.load(award_filename)
award = award.convert_alpha(screen)
direction = (random.randint(-5,5),random.randint(-5,5))
instructions = pygame.mixer.Sound(os.path.join(HERE,'clicktowin.ogg'))
instructions.play()
congratulations = pygame.mixer.Sound(os.path.join(HERE,'youwin.ogg'))
#setup_state_stop

# Rendering Loop
while True:

    # Event Loop
    event = pygame.event.poll()
    while not (event.type == pygame.NOEVENT):
        if (
            event.type == pygame.QUIT or
            (event.type == pygame.KEYUP and event.key == pygame.K_ESCAPE)
        ):
            raise SystemExit(0)
        if event.type == pygame.MOUSEBUTTONDOWN:
            if heart_rectangle.collidepoint(event.pos):
                channel = congratulations.play()
                channel.set_endevent( pygame.QUIT )
                # modifying the model here...
                heart = award
                direction = 0,0
        event = pygame.event.poll()

    # Update the Game Simulation
    if heart_rectangle.top < 0 or heart_rectangle.bottom > 300:
        direction = direction[0], -direction[1]
    if heart_rectangle.left < 0 or heart_rectangle.right > 300:
        direction = -direction[0], direction[1]

    heart_rectangle = heart_rectangle.clamp( screen.get_rect())
    heart_rectangle = heart_rectangle.move(direction)
    if random.random() > .98:
        direction = direction[1],direction[0]

    # Rendering
    screen.fill((255,230,230))
    screen.blit( heart, heart_rectangle)
    pygame.display.flip()
    clock.tick(60)
Documentation
Next Steps
You can go onto either of:
Heart Click in Functions where we learn how to structure our game cleanly
Heart Click ++ where we change our game to make it our own